各パーツや変数の名前
各パーツや変数の名前をつぎのように設定します。
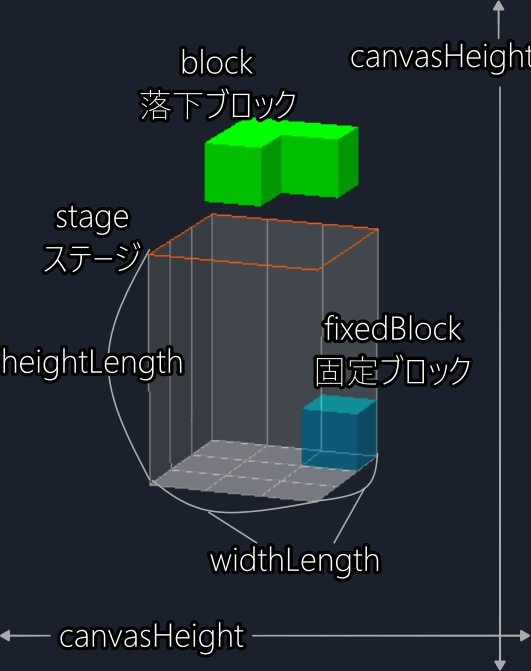
落下するブロックは block とし、床に落ちて固定されたブロックは fixedBlock とします。
また、落下ブロックの一辺のマス目の数を blockSideLength と名付けます。
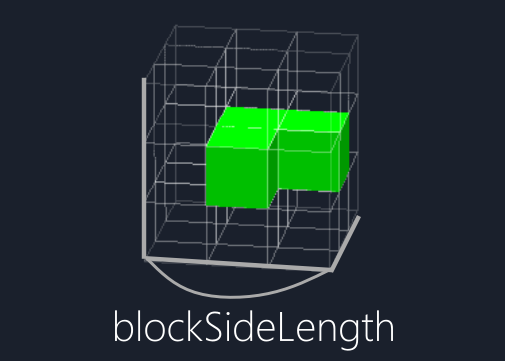
上の画像の場合、 blockSideLength は3です。
これらの設定を書いていきます。
const canvasHeight = 500;
const blockSideLength = 3;
const fullHeightLength = heightLength + blockSideLength;
const dropInterval = 1000;
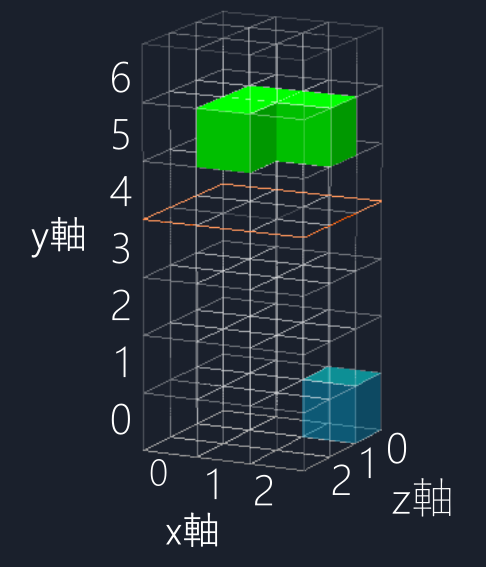
ここではステージの横のマス目を3個、縦のマス目を4個、落下ブロックの一片のマス目を3個に設定しているので、次のような感じになります。
ゲームの状態の設定
ゲームが進行するとゲームオーバーになったり、ストップボタン押してを静止させたり、ゲームの状態が変化していきます。
そこでゲームの状態を次のように名づけておきます。
| initial | 一番最初の状態 |
| running | ゲームがスタートしてブロックが落下している状態 |
| stop | ストップボタンを押して止まっている状態 |
| gameover | ブロックがはみ出てゲームオーバーになった状態 |
そして今現在のゲームの状態を gameState に入れておきます。後で使う変数もここで用意しておきます。
let gameState = 'initial';
Three.jsで使う色やマテリアルの設定
複数のオブジェクトで使いまわすマテリアル(素材)やジオメトリ(形)を用意しておきます。
ここでは色の指定するとき、 0xffffff のように書いていますが '#ffffff' や 'white' 、 '"rgb(255, 255, 255)"' と書くこともできます。色の設定は自由に変更して大丈夫です。
const backgroundColor = 0x1A202C;
const gridColor = 0x888888;
const topLineColor = 0xff5b00;
const blockMaterial = new THREE.MeshLambertMaterial({ color: 0x00ff00 });
const fixedBlockMaterial = new THREE.MeshLambertMaterial({ color: 0x00c3ff, transparent: true, opacity: 0.5 });
// 一面がそろったときの固定ブロックのマテリアル
const completeMaterial = new THREE.MeshLambertMaterial({ color: 0xFFD700, transparent: true, opacity: 0.5 });
const overflowMaterial = new THREE.MeshLambertMaterial({ color: 0xff0000 });
const lineMaterial = new THREE.LineBasicMaterial({ color: gridColor });
const wallMaterial = new THREE.MeshLambertMaterial({ color: 0xaaaaaa, transparent: true, opacity: 0.5, side: THREEDoubleSide });
const squareGeometry = new THREE.BoxGeometry(1, 1, 1);
マテリアルはブロックの陰影も表現したいので MeshLambertMaterial を使用していますが他のものでもかまいません。
固定ブロックや壁は半透明にしたいので transparent: true と opacity: 0.5 を設定しています。
Three.jsの初期設定
Three.jsで3D描画をおこなうのに必要な初期設定をするための関数を作っていきます。
const createRenderer = () => {
const canvas = document.getElementById('three-canvas');
canvas.width = canvasWidth;
canvas.height = canvasHeight;
canvas.style.maxWidth = canvasWidth + 'px';
renderer = new THREE.WebGLRenderer({ canvas: canvas });
関数内ではcanvasの大きさを設定してます。
CSSでcanvasを width: 100% としているため、400px以上には拡大させないよう maxWidth の値も設定します。
シーンを作成する関数
const createScene = () => {
scene = new THREE.Scene();
scene.background = new THREE.Color(backgroundColor);
カメラとコントローラーを作成する関数
const createCamera = () => {
camera = new THREE.PerspectiveCamera(5, canvasWidth / canvasHeight);
camera.position.set(widthLength * 12, fullHeightLength * 6, widthLength * 25);
controls = new OrbitControls(camera, renderer.domElement);
controls.enableDamping = true;
controls.dampingFactor = 0.4;
controls.target = new THREE.Vector3(widthLength / 2, fullHeightLength / 2, widthLength / 2);
カメラは_PerspectiveCamera_ を使って少しだけ遠近感が出るように設定しています。
コントローラーを作成することでゲーム画面をドラッグすると視点を移動できるようになります。
ライトを追加する関数
const light = new THREE.DirectionalLight(0xFFFFFF, 10);
light.position.set(widthLength, fullHeightLength * 10, widthLength * 4);
光の強さや位置を変えると影の付き方が変わります。
床や上部の線を追加する関数
const bottomGrid = new THREE.GridHelper(widthLength, widthLength, gridColor, gridColor);
bottomGrid.position.set(widthLength / 2, 0, widthLength / 2);
const topGrid = new THREE.GridHelper(widthLength, 1, topLineColor, topLineColor);
topGrid.position.set(widthLength / 2, heightLength, widthLength / 2);
床とステージ上部の線は GridHelper で作成しています。
GridHelper の引数には一辺の長さ、区分けする数、中心の線の色、他の線の色を渡します。
区分けする数を1とすることでステージ上部の枠線を作ることができます。
ステージ側面の縦線を追加する関数
const addVerticalLines = () => {
const lineGeometries = [];
for (let i = 0; i <= widthLength; i++) {
const xlineGeometry = new THREE.BufferGeometry().setFromPoints([
new THREE.Vector3(i, 0, 0),
new THREE.Vector3(i, heightLength, 0),
lineGeometries.push(xlineGeometry);
const zlineGeometry = new THREE.BufferGeometry().setFromPoints([
new THREE.Vector3(0, 0, i),
new THREE.Vector3(0, heightLength, i),
lineGeometries.push(zlineGeometry);
const linesGeometry = mergeGeometries(lineGeometries);
const lines = new THREE.LineSegments(linesGeometry, lineMaterial);
複数の縦線のメッシュをシーンに追加するのではなく、複数のジオメトリを結合して一つのメッシュを作成してシーンに追加しています。
こうすることで描画の負荷を減らすことができます。
ステージ側面の壁
const bottomWallGeometry = new THREE.PlaneGeometry(widthLength, widthLength);
bottomWallGeometry.rotateX(90 * Math.PI / 180);
bottomWallGeometry.translate(widthLength / 2, 0, widthLength / 2);
const backWallGeometry = new THREE.PlaneGeometry(widthLength, heightLength);
backWallGeometry.translate(widthLength / 2, heightLength / 2, 0);
const leftWallGeometry = new THREE.PlaneGeometry(widthLength, heightLength);
leftWallGeometry.rotateY(90 * Math.PI / 180);
leftWallGeometry.translate(0, heightLength / 2, widthLength / 2);
const wallGeometry = mergeGeometries([bottomWallGeometry, backWallGeometry, leftWallGeometry]);
const wall = new THREE.Mesh(wallGeometry, wallMaterial);
縦線と同じように複数のジオメトリを結合して一つのメッシュを作成してシーンに追加しています。
コントローラーで視点移動させるための関数
renderer.render(scene, camera);
requestAnimationFrame(animate);
この関数はコントローラーを更新、再描画を高速で繰り返します。
これにより画面をドラッグするとそれに応じて視点が移動しているように見えます。
初期描画する関数
この関数はこれまで作成した関数を実行して初期描画させます。
ここまでのプログラムを試そう
ここまでのプログラムを試すために init3D を実行してみましょう。
ここまで書き込んだらindex.htmlをブラウザから開いてみてください。
画面にステージが表示されて、画面上をドラッグすると視点が移動できていれば成功です!
確認したら init3D() は消してください。